Category: Uncategorized

  • Are Your Custom Lunch Bags Food-Safe and Compliant? Liners, PVC, and the Rules That Apply

    Are Your Custom Lunch Bags Food-Safe and Compliant? Liners, PVC, and the Rules That Apply

    When you order lunch bags in bulk, food safety is not only about how long the bag keeps a sandwich cold. It is also about what the bag itself is made of, because the liner sits directly against food and, if the bags are aimed at kids, a set of federal and state rules decides what is allowed to be in that material at all. This guide explains the liners you will be quoted, the chemistry that separates them, and the compliance thresholds a buyer should know before signing off on a large run.

    The liner is the part that touches food

    Most insulated lunch bags are built the same way: an outer shell of polyester, a middle layer of foam insulation, and an inner liner that forms the food compartment. The shell and foam are engineering choices about looks and cold retention, but the liner is the food-contact surface, so it is where material safety actually matters. The three liners you will see most often are PEVA, PVC, and TPU, and they behave very differently.

    PEVA is the chlorine-free workhorse. Its chemical backbone is built without chlorine, and it reaches flexibility through a vinyl acetate component rather than added plasticizers, so it is made without the phthalates that softened PVC relies on, and it is generally BPA-free and low-VOC. It is permitted for food-contact use under FDA rules for films and laminates within defined extractive limits. Its weakness is heat: PEVA can warp or melt if you pour boiling water into it or run it through a hot dishwasher, so it suits cold lunches, not hot food or the microwave.

    PVC liners are inexpensive and wipe clean well, but flexible PVC contains chlorine and typically depends on phthalate plasticizers to stay soft, and those plasticizers can migrate out of the material over time. TPU sits at the premium end: it is durable, handles heat better than PEVA, and is made without those plasticizers, but it costs more, which is why it shows up in higher-end or heavily-used bags rather than budget promotional runs.
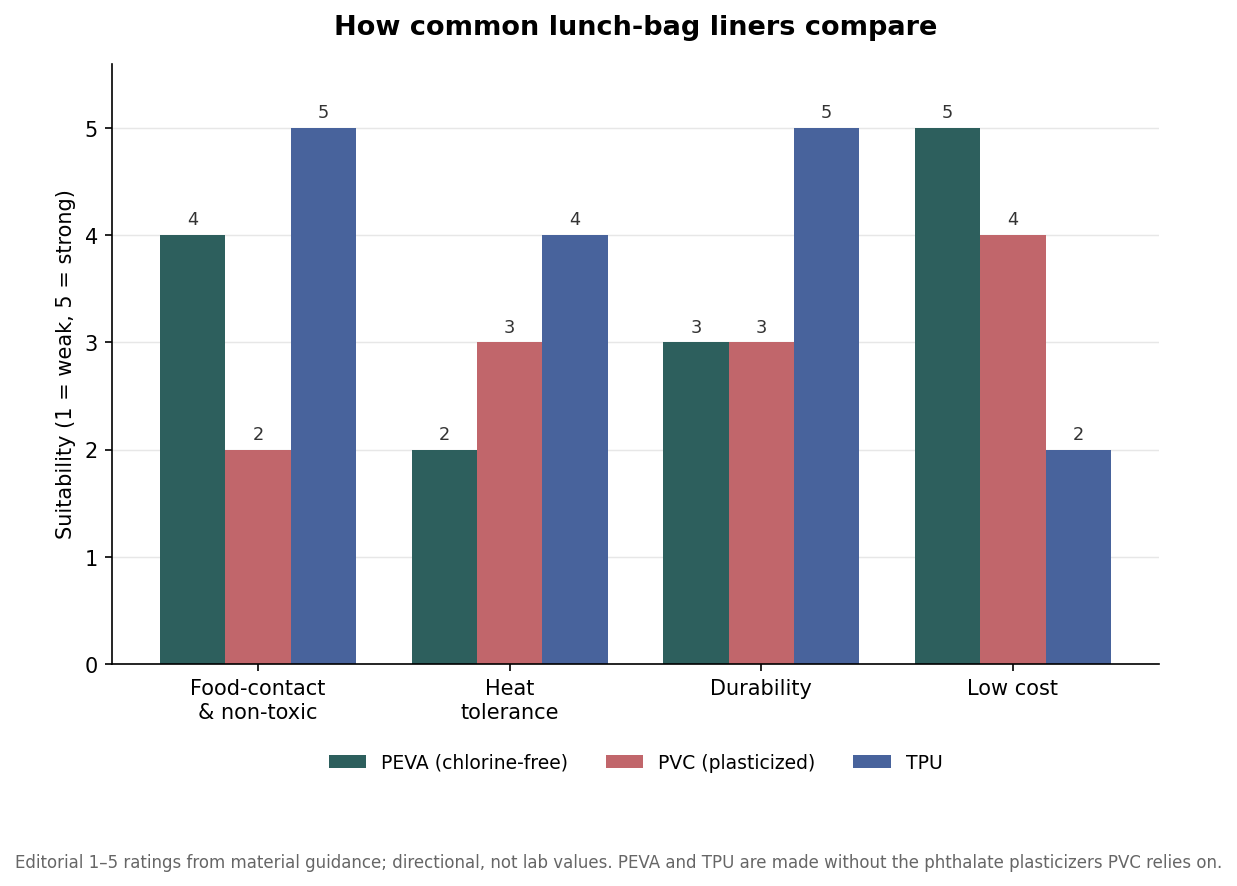
    Grouped bar chart comparing PEVA, PVC, and TPU lunch bag liners on food-contact safety, heat tolerance, durability, and cost
    PEVA, PVC, and TPU liners trade off safety, heat tolerance, durability, and cost differently.

    When compliance rules kick in

    The single question that changes the compliance picture is whether the bag is a children’s product. Under the Consumer Product Safety Improvement Act, a children’s product is one designed or intended primarily for children twelve and under, and those products face content limits that ordinary adult goods do not. If your lunch bags are marketed for school-age kids, decorated with characters, or sized and styled for children, assume the children’s-product rules apply and plan for testing.

    Two limits matter most. Total lead content in a children’s product is capped at 100 parts per million, and lead in any paint or surface coating is capped tighter at 90 parts per million. Separately, a group of eight named phthalates is restricted to 0.1 percent by weight, which is 1,000 parts per million, in children’s toys and childcare articles under the relevant regulation. These are not label claims you can simply assert; children’s products generally require testing by a CPSC-accepted laboratory and a Children’s Product Certificate documenting the results, using recognized test methods run by accredited labs.
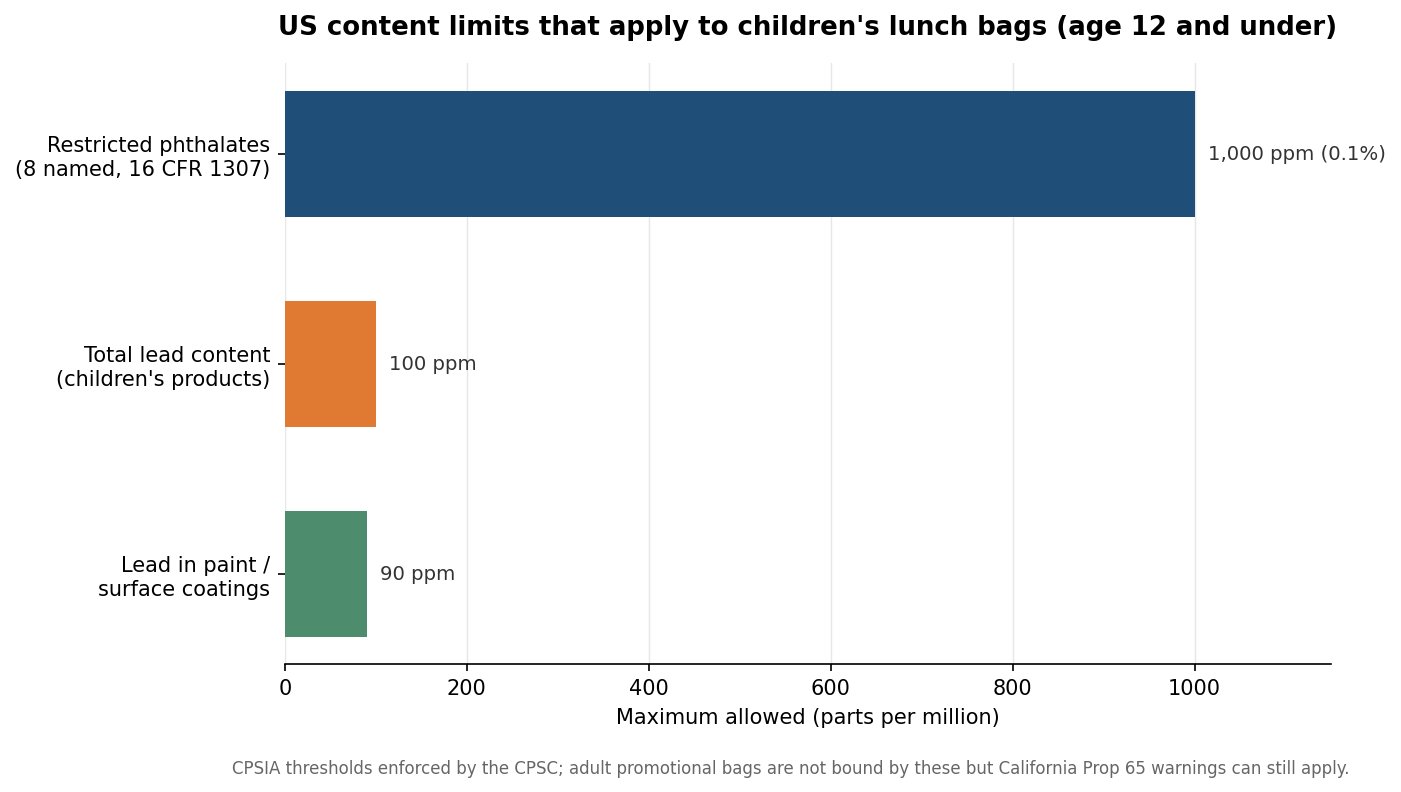
    Horizontal bar chart of US content limits for children's products: phthalates 1000 ppm, total lead 100 ppm, surface-coating lead 90 ppm
    The CPSIA content limits that apply once a lunch bag counts as a children’s product.

    Adult bags, Prop 65, and the gap people miss

    If your bags are genuinely aimed at adults, the CPSIA lead and phthalate limits above do not bind them, and this is where buyers sometimes assume they are fully off the hook. They are not. California’s Proposition 65 works differently: rather than banning a substance, it requires a clear warning when a product can expose someone to a listed chemical, and both lead and the phthalate DEHP are on that list. A flexible PVC liner that leaches DEHP, or a component with trace lead, can trigger a Prop 65 warning obligation for anything sold into California, regardless of the buyer’s age. Getting a straight answer from your supplier about liner chemistry protects you here even for adult products.

    The practical takeaway is to decide the audience first, because it sets the bar. A branded bag for a corporate giveaway to employees is an adult product and can lean on cost-effective PEVA with a supplier statement on chemistry and Prop 65 status. A bag destined for an elementary school, a kids’ event, or retail shelves in the children’s aisle is a children’s product and needs the lead and phthalate testing and certificate before you commit to a large quantity.

    What to ask for before you approve a run

    Put the safety questions in the specification rather than discovering them after delivery. Ask the supplier to name the exact liner material and confirm it is food-contact rated, and request that it be free of the restricted phthalates and, ideally, chlorine-based PVC. For any children’s product, ask for third-party test reports against the CPSIA lead and phthalate limits and a Children’s Product Certificate, and confirm which accredited lab performed the testing. For anything that may sell into California, ask directly whether a Prop 65 warning is required and, if so, who is responsible for applying it.

    None of this is legal advice, and a compliance lab or attorney is the right call for a high-volume or retail program, but knowing the vocabulary changes the conversation. A buyer who asks for the liner material by name, states the intended age group, and requests the specific certificates gets a defensible order; one who assumes a supplier has handled it can end up with a warehouse of bags that cannot be sold where they were meant to go. The chemistry and the paperwork cost far less to sort out at the quote stage than after a container has shipped.
  • Will Your Lunch Stay Safe Until Noon? A Food-Safety Guide to Insulated Bags

    Will Your Lunch Stay Safe Until Noon? A Food-Safety Guide to Insulated Bags

    The real job of a lunch bag is not to look good on a desk; it is to keep food out of the range where bacteria thrive until someone eats it. A packed sandwich, a yogurt, or a container of chicken salad is safe when it is cold and unsafe when it drifts warm, and the whole point of an insulated bag is to slow that drift. Understanding the two temperatures and the two time limits behind food safety makes it obvious why some lunches are fine at noon and others are quietly risky, and it tells you what to look for when you buy bags in any quantity.

    The danger zone, in two numbers

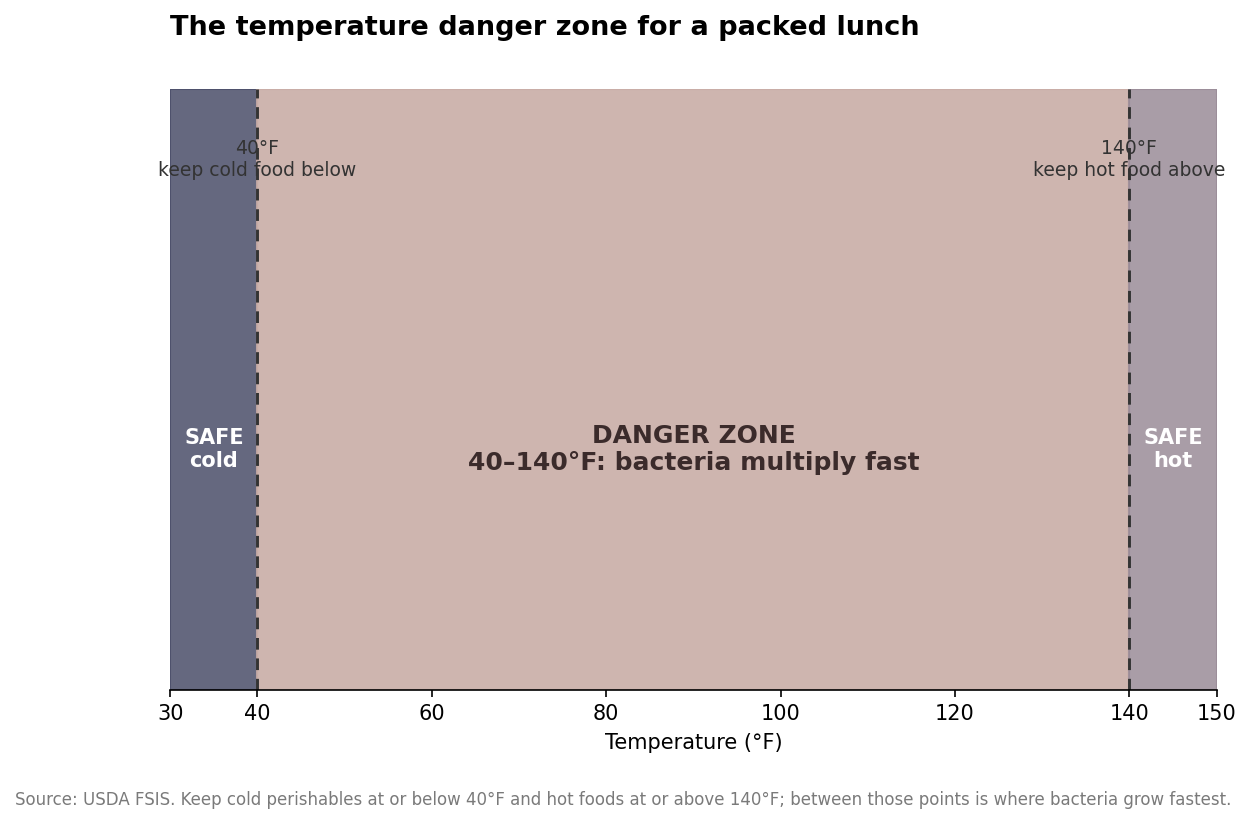
    Food safety for a packed lunch comes down to a temperature band. According to USDA guidance, harmful bacteria multiply fastest between 40 and 140 degrees Fahrenheit, a range the agency calls the danger zone. Below 40 degrees, cold perishables stay safe; above 140 degrees, hot foods stay safe. The trouble with a lunch is that it usually starts cold and then sits for hours in a warm room, a locker, or a car, sliding straight into the middle of that band unless something is actively keeping it cool.

    Temperature number line showing the USDA danger zone from 40 to 140 degrees Fahrenheit, with safe-cold below 40 and safe-hot above 140
    Keep cold food below 40°F and hot food above 140°F; the span between is where bacteria grow fastest.

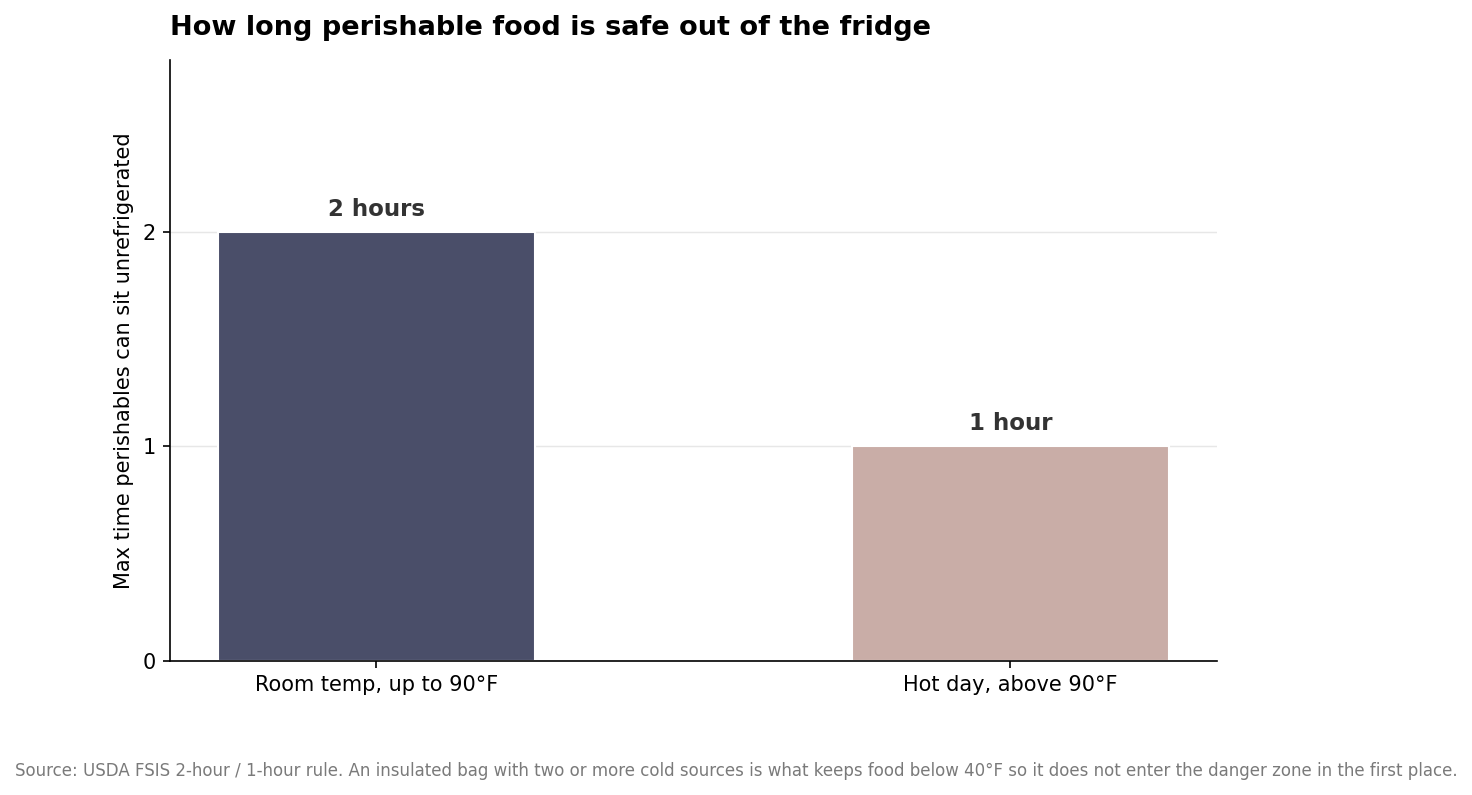
    Time is the second half of the rule. Perishable food should not sit in the danger zone for more than two hours total, and that limit drops to one hour when the surrounding temperature is above 90 degrees, such as an outdoor job site or a hot car in summer. Those hours are cumulative across the day, not a fresh clock at each stop, which is why a lunch that rode in a warm bag all morning has less margin left than it appears. An old-fashioned paper sack offers essentially none of this protection and is considered unsafe for perishables beyond that two-hour window.

    Why the bag alone is not enough

    An insulated bag slows heat transfer, but it does not make cold; it only preserves the cold you put inside it. That distinction is where most food-safety mistakes happen. USDA guidance is specific about the fix: pack at least two cold sources with the food. The recommendation is two frozen gel packs no smaller than about five by three inches each, or a single gel pack combined with a frozen juice box or a frozen bottle of water. Two sources matter because one pack thaws faster than people expect, and the redundancy keeps the interior below 40 degrees through a full morning.

    Bar chart of maximum safe unrefrigerated time for perishables: 2 hours up to 90 degrees, 1 hour above 90 degrees
    The USDA 2-hour rule, dropping to 1 hour above 90°F; cold packs are what keep food out of the zone.

    The frozen items do double duty. A bottle of water frozen overnight acts as a cold source on the way in and becomes a cold drink by lunch, and a frozen juice box does the same. Positioning helps too: cold air falls, so placing a gel pack on top of the food, not just under it, keeps the whole interior cooler. The goal is not to make the food icy but to hold it under that 40 degree line so the two-hour clock effectively never starts.

    Packing habits that buy you margin

    Start cold and stay out of the heat. Refrigerate the assembled lunch overnight rather than packing warm leftovers straight from the counter, since a bag can only hold a temperature, not lower it quickly. Fill empty space, because a half-empty bag has more warm air to fight; tucking the cold packs snugly against the food reduces that air gap. Keep the bag out of direct sun and out of a parked car, where interior temperatures climb into the danger zone within minutes on a warm day. For hot meals, the mirror image applies: pack them steaming into an insulated container meant to hold heat, aiming to keep them at or above 140 degrees rather than letting them cool into the zone.

    These habits are cheap insurance. None of them require special equipment beyond a freezer and a little planning the night before, and together they turn an insulated bag from a nice-looking accessory into a genuine cold-holding system.

    It is also worth confirming rather than assuming. An inexpensive fridge or cooler thermometer tucked into the bag for a trial run tells you whether your packing routine actually holds the interior below 40 degrees across a real morning, and it quickly exposes weak spots like a single undersized ice pack or a bag left near a sunny window. Freeze gel packs solid overnight rather than grabbing a partially thawed one, since a soft pack has already spent much of its cooling capacity before the day even begins.

    What this means when you buy bags in bulk

    If you are ordering lunch bags for a school, a team, or a promotional run, food safety should shape the specification, not just the artwork. Look for a genuine insulated liner rather than a single thin foil layer, and make sure the interior volume leaves room for a real lunch plus two cold packs; a bag sized only for the food itself forces the buyer to choose between a meal and the cold sources that keep it safe. Size the bag to the containers people actually carry, since a snug fit reduces the warm air the cold packs have to overcome. A wipeable, sealed liner also matters, because a bag that traps moisture and spills becomes hard to clean and starts to smell long before it wears out.

    Insulation performance varies widely between constructions, and no soft-sided bag keeps food cold indefinitely, so treat any bag as a way to extend the safe window rather than remove the limit. Specify a real liner, leave room for two cold sources, keep the whole thing out of the heat, and a packed lunch will still be sitting comfortably below 40 degrees when the lunch bell rings.

  • The Complete Buyer’s Guide to Custom Lunch Bags

    Lunch bags are compared on capacity, colour and price. None of the four questions below is about any of those.

    How does the liner meet the shell?

    Welded means no stitch line and no absorbent seam allowance behind it.

    Stitched means a permanent damp seam you can never reach. That is the smell.

    How wide is the base, in centimetres?

    Measure your box first. Litres tell you volume, not whether the box lies flat.

    For a mixed group, size to the largest common footprint, never an average.

    What is the closure made of?

    Zip gauge, slider type and pull size. Or buckle type and the webbing behind it.

    It is cycled about five hundred times a year, which is why it fails first.

    Where does the name go?

    An external light panel that takes a laundry marker, not a label sewn in a seam.

    A cloakroom of thirty identical bags is a sorting problem, not a branding one.

    And one thing it is not

    A lunch bag is not a cooler. If temperature matters, buy an insulated cooler.

  • Why Your Lunch Bag Smells (It Is Not What You Are Cleaning)

    A lunch bag that smells is almost never dirty on the surface people can see. It is damp somewhere they cannot.

    The stitch line is a perforation

    Sewing a liner in punches hundreds of holes through the waterproof layer.

    Liquid finds them on the first spill and goes behind the liner.

    The seam allowance is absorbent cloth

    Behind the stitch line sits raw fabric, folded, in a sealed pocket.

    No cloth, sponge or brush reaches it, and it never fully dries.

    Which is why wiping does not fix it

    You are cleaning the one surface that was never the problem.

    The bag looks spotless and still smells, so people assume it is just old.

    The fix is a build decision

    A welded liner has fused seams: one continuous surface, no allowance, nothing hidden.

    Where welding does not suit a format, bind the seam so no raw edge is exposed.

  • Measure the Box First

    Capacity is the standard way to sell a lunch bag and it is close to useless, because it describes volume and the problem is shape.

    Boxes are wider than people think

    A standard rectangular meal-prep box has a bigger footprint than most bags allow.

    Two centimetres short and it will not lie flat, whatever the litre figure says.

    An angled box ruins the bag

    Forced in at a slant, it stops the bag closing and tips the contents.

    People stop using the bag rather than the box, because the box was theirs first.

    So quote the base

    Internal base length and width, against a container the buyer names.

    It costs nothing to state and it is the number that decides the outcome.

    Mixed groups: size to the largest

    An average-sized bag fails everybody at the top of the range.

    The largest common footprint works for everybody and wastes very little.

  • Five Mistakes to Avoid When Ordering Custom Lunch Bags in Bulk

    Five Mistakes to Avoid When Ordering Custom Lunch Bags in Bulk

    Most regrets about a bulk lunch bag order are locked in before a single bag ships. The mistakes are rarely dramatic; they are small specification choices that look fine on a sample and turn into complaints once a few hundred bags are in the field. Whether you are buying for a school, a company giveaway, or a product line, the same handful of errors comes up again and again. Here are five worth catching before you approve the order, each with the concrete numbers you need to get it right.

    Mistake 1: Sizing by look instead of by liters

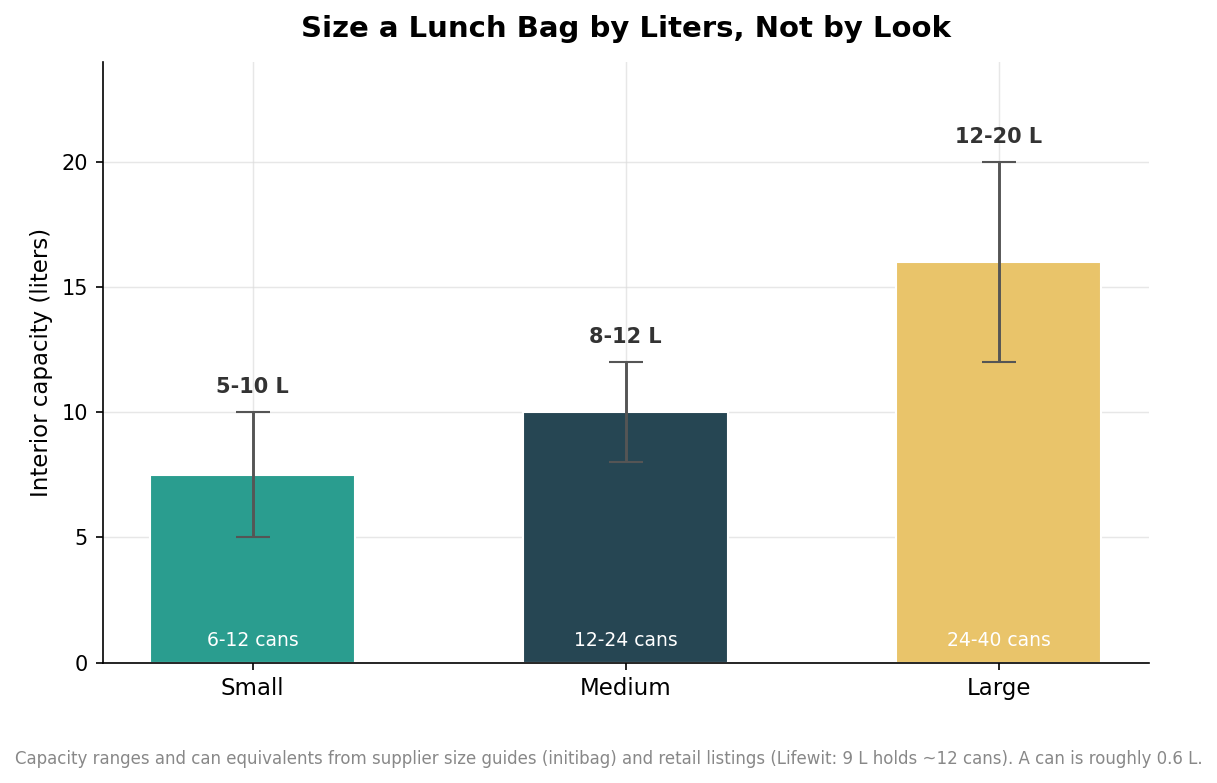
    A lunch bag that photographs well can still be the wrong size, because your eye reads shape while the meal needs volume. Spec capacity in liters and cross-check it against a can count, which is the most honest yardstick the industry uses. A small bag runs roughly 5 to 10 liters and holds the equivalent of about 6 to 12 cans, enough for a sandwich, a drink, and a snack. A medium bag lands around 8 to 12 liters and 12 to 24 cans, the sweet spot for an office or school day. A large bag is 12 liters and up, from 24 to 40 cans, which suits families and long outings but gets bulky fast.

    Bar chart of insulated lunch bag capacity in liters for small, medium, and large sizes with can-equivalent labels
    Capacity by size tier in liters, with can equivalents; a can is roughly 0.6 liters.

    As a rule of thumb, one standard can is about 0.6 liters, so a bag advertised as holding twelve cans is roughly nine liters of usable interior. Decide the real contents first, a lunch versus a full day of food, then pick the liter band that fits. Buying one size too small is the most common miss, and it is the one people notice every single day.

    Mistake 2: Ignoring the liner

    The liner is the part that actually touches food, and it is where cheap bags cut corners. Look for a food-grade PEVA liner, which is chlorine-free, wipeable, and leak-resistant, so a tipped container or a sweating ice pack does not soak into the insulation and turn sour. Avoid unspecified PVC liners, which are the budget default and the ones most likely to hold odors and raise food-contact concerns. A good liner earns its keep in two ways: it wipes clean in seconds, and it contains spills instead of wicking them into layers you cannot wash. If a supplier cannot name the liner material, treat that as an answer in itself.

    Mistake 3: Treating all insulation as equal

    Two bags with identical exteriors can hold temperature very differently depending on what is between the shell and the liner. Thin foam with no reflective layer fades quickly; a proper build pairs a few millimeters of foam with a reflective foil layer that slows heat transfer. This is a deep topic in its own right, and it is worth reading a full breakdown of insulation construction before you commit, but the short version for an order sheet is to insist on both a foam layer and a foil layer rather than accepting a single thin liner described vaguely as insulated. For anything that has to keep food cold through a warm commute, the insulation is not the place to save a few cents per unit.

    Mistake 4: Choosing a print method that fights the fabric

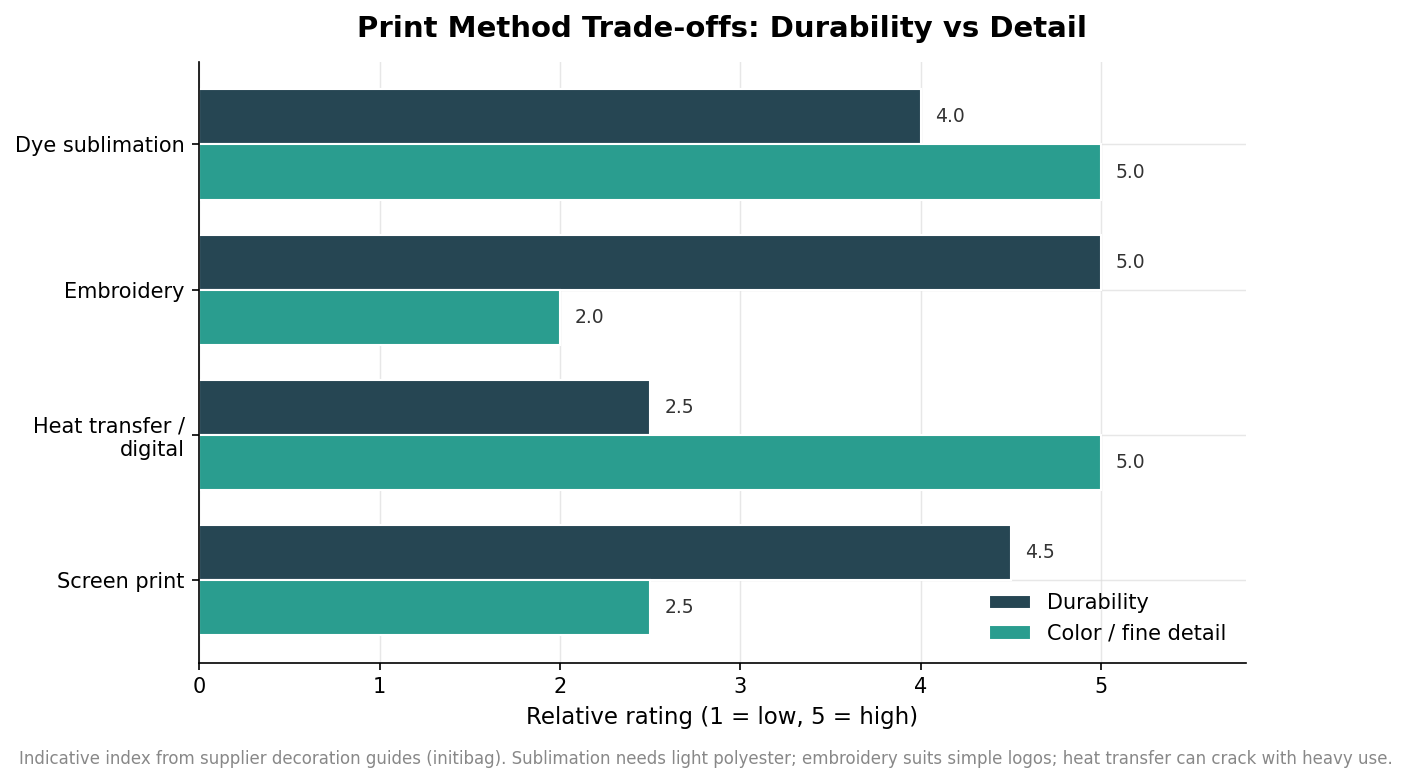
    Your logo can fail for a reason that has nothing to do with the art and everything to do with the pairing of method and material. Screen printing gives bold, durable color and is economical at volume, but it handles only simple designs and limited colors. Heat transfer and digital printing reproduce photo-quality, full-color art with no minimum, but the print can crack or peel under heavy use, so they suit shorter runs and gentler duty. Embroidery is the most durable and premium-looking option, yet it works best with simple logos and struggles with fine detail. Dye sublimation delivers unlimited color but needs a light-colored polyester surface to work at all.

    Grouped horizontal bar chart rating screen print, heat transfer, embroidery, and sublimation on durability and color detail
    Indicative durability and color/detail trade-offs across the common bag decoration methods.

    The trap is applying a detail-hungry method to the wrong surface: heat transfer and digital prints do poorly on rough or coated fabrics, which is exactly what many insulated shells are. Smooth polyester and nylon accept nearly any method, canvas and cotton favor screen printing and embroidery, and coated or textured materials should steer you toward screen printing. Match the method to the fabric first, then to the artwork, and confirm both against a physical proof on the actual bag rather than a flat mockup.

    Mistake 5: Forgetting minimum order quantity and lead time

    The last mistake is a calendar problem. Custom lunch bags tend to have a lower minimum order quantity than other bags, with simple designs often starting around 50 to 100 units, though insulated and specialty builds sit higher. Lead times follow the complexity: a simple bag can turn in as little as two weeks, while insulated or fully custom designs commonly run three to four weeks, with rush production available at a premium. These figures are indicative and shift with the factory, the decoration method, and your volume, so confirm them in writing for your specific order. The practical move is to work backward from the date you actually need the bags in hand, add a buffer for a physical proof and for shipping, and place the order early enough that you are choosing the right bag rather than the only one that can arrive in time. An event date does not move; your order should respect that from the start.

    Getting all five right

    None of these are exotic requirements. Size by liters, name the liner, insist on real insulation, match the print method to the fabric, and plan the calendar around a proof. Settle those five on the specification sheet and the bag that arrives will be the one you meant to buy, in the quantity you need, on the day you need it.

  • What’s Actually Inside an Insulated Lunch Bag: A Materials Guide

    What’s Actually Inside an Insulated Lunch Bag: A Materials Guide

    An insulated lunch bag looks like a single object, but it is really three material systems stacked together: a liner that touches your food, an insulating layer that slows heat, and an outer shell that takes the abuse and carries the print. Each layer is a separate decision, and the cheap bags cut corners on the ones you cannot see. Understanding what goes into each is the difference between a bag that keeps lunch cold until noon and one that sweats through by ten.

    The liner is where food safety lives

    The inner lining is the layer that matters most and gets scrutinized least. The current standard for a food-contact liner is PEVA, a polyethylene vinyl acetate film that is BPA-free and made to comply with FDA and EU food-contact rules. It is genuinely waterproof, able to hold a melted ice pack without leaking into the shell, and it does not carry the health questions that follow older materials. The alternative you still see on bargain bags is PVC, which is cheaper but lacks food-contact safety designations and tends to hold onto smells over time, so last week’s tuna greets you on Monday.

    Some bags add a reflective aluminum-foil layer behind the liner. That is not decoration: a foil layer can reflect on the order of 95 to 97 percent of radiant heat back out of the bag, which meaningfully slows warming on a hot car seat. Foil works alongside foam rather than replacing it, so the best-performing bags use both.

    Insulation thickness is the spec that keeps food cold

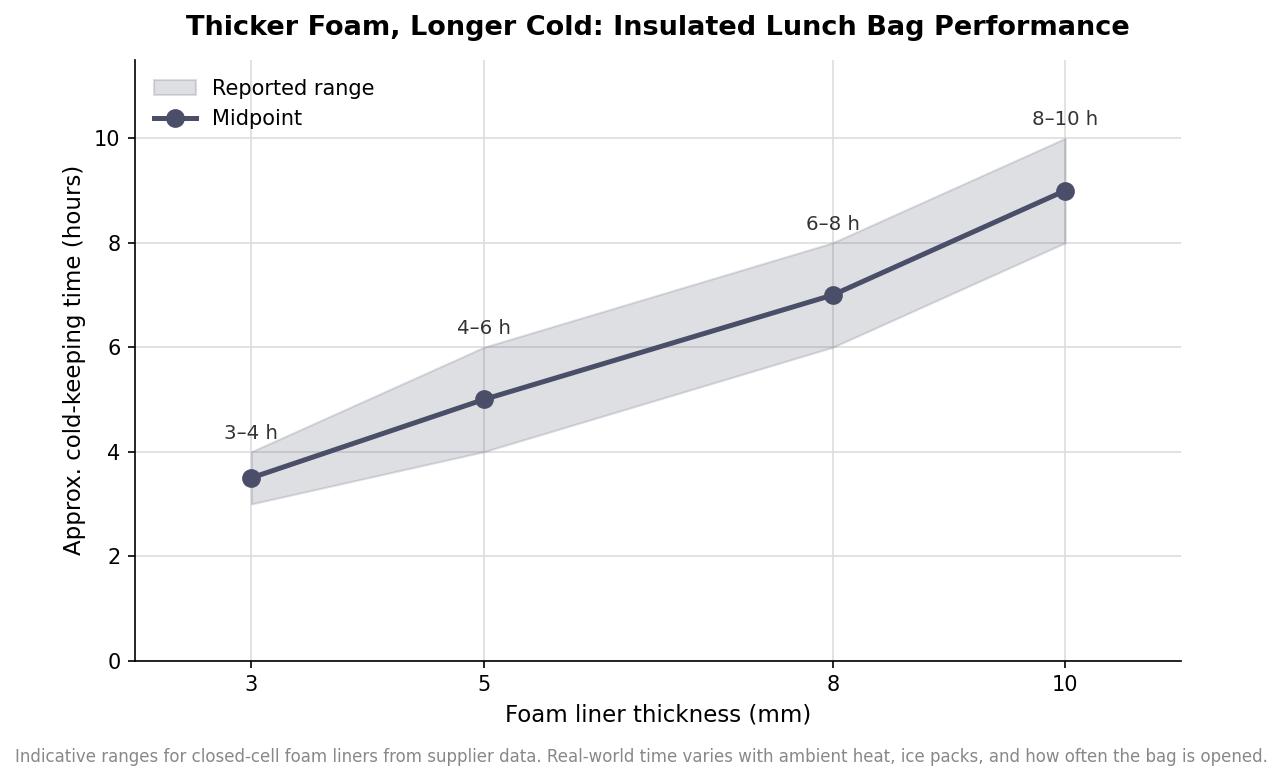
    If one number predicts performance, it is foam thickness. The closed-cell foam sandwiched between liner and shell is what actually resists heat transfer, and its thickness maps closely to how long the bag stays cold. Supplier data lines up consistently: about 3 millimeters of foam holds temperature for roughly 3 to 4 hours, 5 millimeters for 4 to 6, 8 millimeters for 6 to 8, and 10 millimeters for 8 to 10 hours.

    Line chart with shaded range showing cold-keeping hours rising with foam liner thickness from 3mm (3-4h) to 10mm (8-10h)
    Cold-keeping time tracks foam thickness closely; the band shows the reported range.

    The foam type matters too, though less than thickness. Standard PE foam has a thermal conductivity around 0.033 to 0.040 watts per meter-kelvin; premium EVA foam improves cold-keeping time by roughly 15 to 25 percent for the same thickness, at a higher cost. For a bag that sits on a desk near air conditioning, 5 millimeters is plenty. For a job site in July with no fridge, spec 8 to 10 millimeters and expect the bag to be a little bulkier and heavier as a result. Treat every one of these numbers as indicative: real-world hold time also depends on ambient heat, whether you add an ice pack, and how often the bag gets opened.

    The outer shell balances durability, weight, and cost

    The shell is the part buyers judge by feel, and it sets the bag’s toughness and weight. The workhorse is 600D polyester, often called 600D Oxford, which sits in the mid-to-high range and balances abrasion resistance against cost; lighter polyesters run down to 150D and cost less but scuff sooner. Nylon offers a better strength-to-weight ratio and suits outdoor and heavy-use bags at a premium. On the natural-fiber side, canvas and cotton are biodegradable and have a premium look, but they are heavier and need care to stay water-resistant. Recycled options, RPET woven from plastic bottles and recycled canvas, let a brand tell a sustainability story, while inexpensive non-woven polypropylene keeps giveaway costs rock-bottom.

    Waterproofing is a construction detail, not just a fabric one. The most leak-resistant bags close their seams with heat welding rather than stitching, since needle holes are exactly where water finds its way out, and they pair that with reinforced edges and a leakproof zipper.

    The shell fabric quietly limits your branding

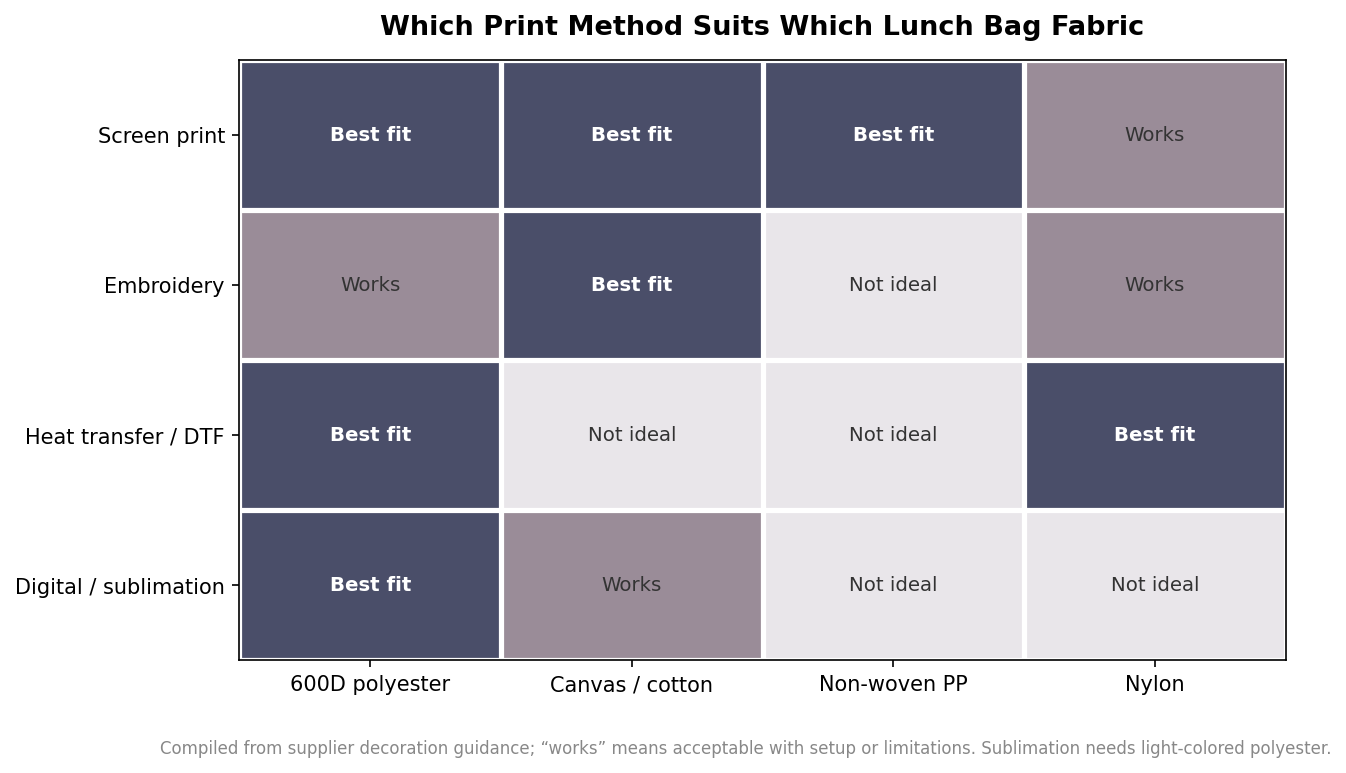
    Whatever fabric you choose narrows how you can decorate it. Screen printing is the cost-effective bulk workhorse and lays down bold, opaque color on polyester, canvas, and non-woven surfaces, which is why most promotional lunch bags use it. Embroidery gives a premium, textured, durable mark and loves canvas and cotton, but it struggles on flimsy non-woven material. Heat transfer and DTF deliver photo-quality, full-color art but want a smooth surface, so they shine on polyester and nylon and fight a textured canvas. Full sublimation produces edge-to-edge photographic prints, with the important catch that it only works on light-colored polyester, because the dye needs a white poly base to show true color.

    Heatmap of decoration method suitability across lunch bag fabrics, rating screen print, embroidery, heat transfer, and sublimation on each fabric
    The shell fabric decides which decoration methods are a best fit versus a compromise.

    The practical takeaway is to decide the artwork and the fabric together. A photographic, full-bleed design pushes you toward light polyester and sublimation; a bold one- or two-color logo on a bulk run points at screen printing on 600D polyester; a premium corporate gift leans canvas with embroidery.

    What ordering looks like in practice

    Insulated bags carry a couple of production realities worth planning around. They tend to have a lower minimum order quantity than more complex bag styles, which helps for smaller branded runs. Lead times run about 2 to 4 weeks for a simple printed design and closer to 3 to 4 weeks for insulated construction, since the extra foam and liner layers add assembly steps, with standard shipping on top typically landing in the 10 to 20 business-day range. If a bag is tied to an event date, count backward from that and add a buffer, because the insulated build is the slower one.

    Read a spec sheet in that order, liner material first, then foam thickness, then shell fabric and how you will decorate it, and you can tell in about thirty seconds whether a lunch bag will actually do its job or just look the part on a product page.

  • Hello world!

    Welcome to WordPress. This is your first post. Edit or delete it, then start writing!